HDSLR cameras shoot 16:9, which is fine, but sometimes you want a more cinematic look. The two perhaps most common ratios are 1.85:1 (Academy Flat) and 2.35:1 (Cinemascope). Read more about cinema aspect ratios here.
I edit in Premiere CS5, and there are two ways I can export my videos with wider aspect ratio. I can export with letterboxing (black stripes masking the upper and lower parts of the image), or I can crop the the video when I export with Media Encoder.
Let me show you how.
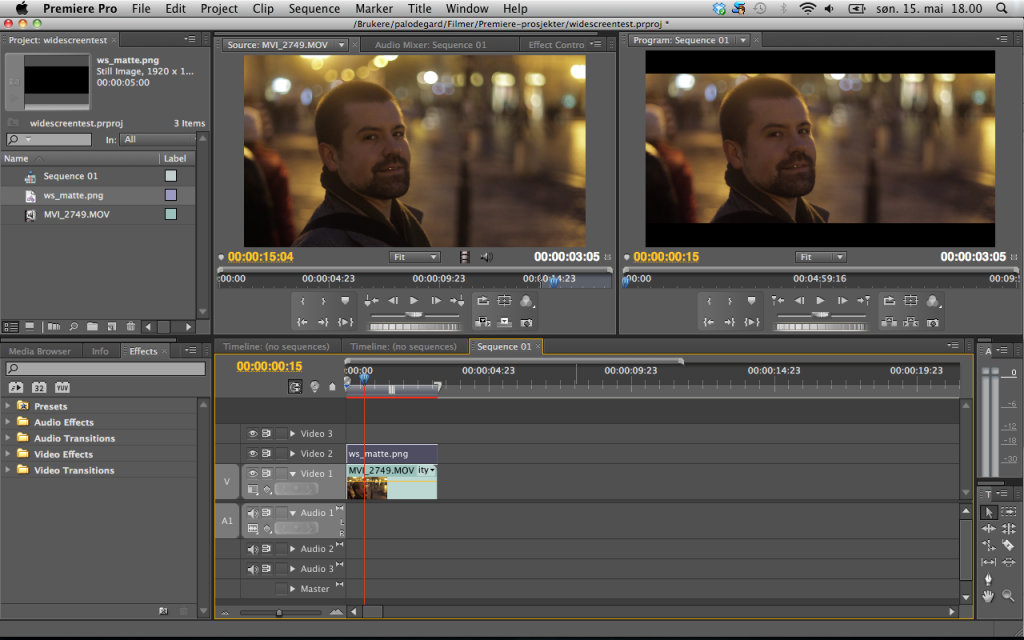
First, you need to see exactly what parts you’re cropping out. You do this by applying a mask with the appropriate aspect ratio to a video layer above your footage. You can do this in Premiere’s Title tool or in Photoshop. My video is full HD, that is 1920×1080 pixels – so I made a Photoshop document with those dimensions. Then I draw two black rectangles and place them at the upper and lower edges of the image. If I want to go Cinemascope I crop 132 pixels – so I make the rectangles 1920×132 pixels. (Note: this isn’t excactly 2.35, but close enough, and actually avoids some exporting problems.)
 Then I export this image as a PNG-file with transparent background, so only the black rectangles, the letterbox, is visible. You can download and use mine, if you like. Just click the image on the right to get the full size, and right-click to save.
Now you’re ready to import the mask into Premiere, and place it on top of all the other video layers.
Here’s an example of mine, with the original footage seen in the source monitor (left) and the cropped image in the program monitor (right). Notice the matte being on the topmost layer in the timeline, and of course stretched to cover the entire length of the footage.
 Once you’ve done this you have some headroom to move your footage vertically. Make sure you don’t cut any heads or lose any valuable information.
Once you’ve positioned all your footage correctly and applied any effects and transitions, you’re ready to export. Go to File>Export>Media to open the Media Encoder.
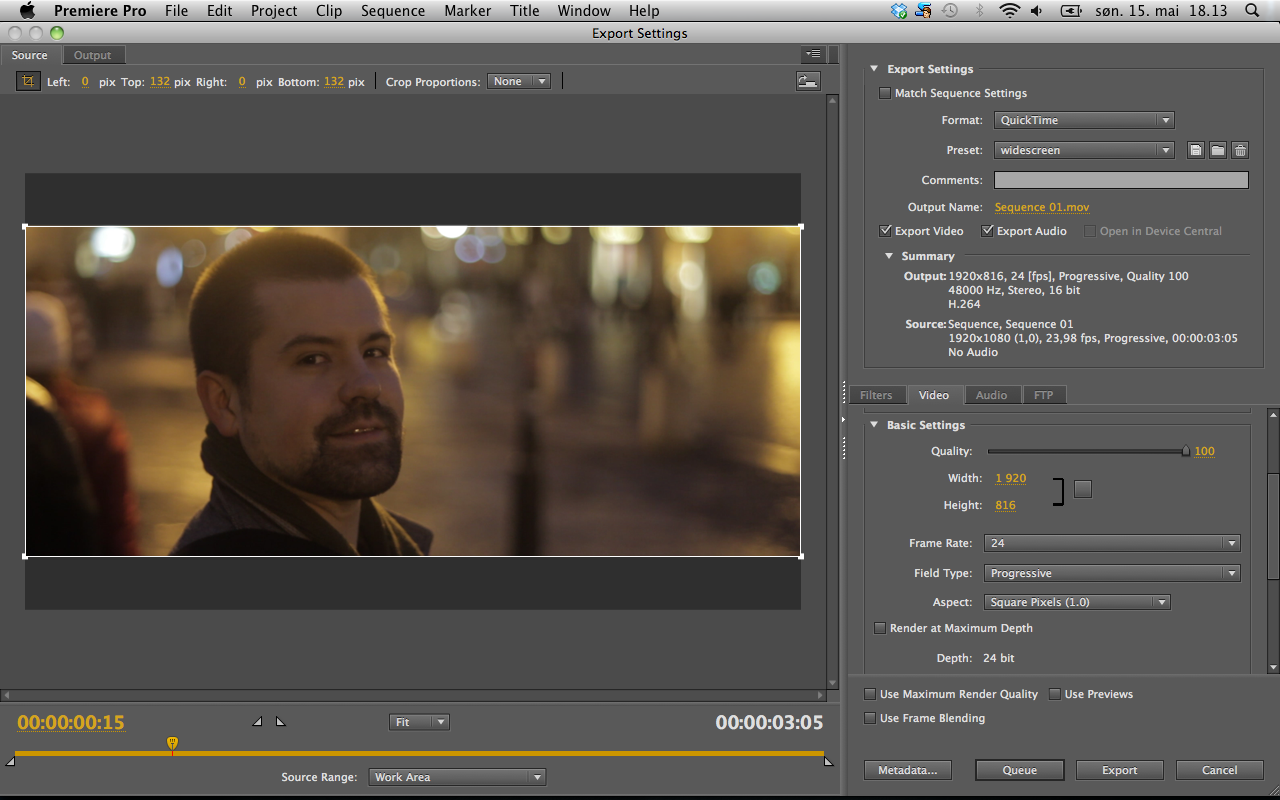
In your source monitor you have your cropping options above the image. Specify 132 px for top and bottom. Then choose your export settings, for example QuickTime H.264, and under Video>Basic Settings make sure you specify a width of 1920 and a height of 816. Make sure your frame rate and Field Type (Progressive) is correct, and your Aspect should be square pixels. To save some work next time, save your settings as a preset. Here are my settings:
 Now you can go ahead and export, and end up with a nice widescreen video without letterboxing. Videos of this type are great to upload to Vimeo, but YouTube always adds letterboxing anyway, I think.
Here’s Philip Bloom explaining how to do all this in Final Cut Pro:

Kit Mackenzie
Thank you very much!
Being using a videocopilot preset to do this in After Effects but with the newer playback engines in Premiere I was convinced I could save previewing time by doing it inside of that. Thank you for you files as well, very appreciated 🙂
Pål
Glad I could help, and thanks for stopping by 🙂
bernardo
Thanks! This was brilliant and thanks for your PNG 😉 A+++
Anti Dragos
No ofence but this is TOO COMPLICATED. All you need to do is set the project from the begining by devideing 1920 by 2.35 (the aspect ratio) = 817. This way the result is
1920 x 817 (2.35:1 aspect ratio). This is “Full HD Cinemascope”
Pål
Anti Dragos: Yes, and no. If you set the project at those settings from the beginning you lock yourself to that output, or less. I prefer to have the project settings be the same as my source settings, and make my changes at the output end. That way I can have the same source footage and the same edit and output them both as max quality 1080p or 2.35:1 from the same project.
RG
Don’t use a Photoshop mask. Way too complicated. Use the Crop Effect for the bars and the Transform Effect for moving the picture.
Shivesh
You explained it so well Pål !!
I visited many forums but not as nicely explained as you did in here.
I am a DP and trying my hands in editing , this is a great tute for someone like me, a newbie in editing.
Thank you so much.
Cheers !
Shivesh
Pål
Shivesh: Glad I could help! The reason I wrote this how-to was that I didn’t find any good tutorials for aspect ratios in Premiere on the web. So I figured that when I found a good way to do it, I should share.
Rod
Thanks. Just a question: How do you find out the pixel size of the matte if you want one of the followings
– Academy Flat for FullHD
– Cinemascope for HD
– Academy Flat for HD
I suppose that for the Cinemascope HD you may just reduce the size of your matte, isn’t it?
Pål
Hi Rod!
To find the size of the matte for different aspect ratios you have to whip out your calculator, or use this excellent aspect ratio calculator.
So, if you want to make a cinemascope matte for a video that’s 1280×720 px, the calculator tells us that the height should be 545 px. 720-545 is 175: the number of pixels we need to subtract. Divide by two, since we have a lower and upper matte. So if I mask 87 px on top and 88 px at the bottom, I get a Cinemascope ratio.
Hope that clarifies things!
Rod
Thanks! I creted a few useful mattes with the ratio calculator!
PeteL
Wonderful tutorial, thank you so much!
One small tweak that occurred to me while using your PNG file…If you make your matte with white bars on the top and bottom then you can be sure your video is covering the entire space available and not leaving any unwanted black in the top or bottom edges.
Just thought. Thanks a ton!
pete
Pål
PeteL: Good point! Of course, the matte doesn’t have to be black. You’re not exporting it anyway, so it can be any colour you like. So especially if you’re working with footage that has darks at the edges, white mattes would make it easier to control the crop.
Leon
Any idea how to do this in Vegas Pro?
Pål
Leon: Sorry, I have never used Vegas Pro, so I have no idea. Maybe somebody else reading this does? If so, please let us know!
Miguel Torres
Hello all!!!
I made it from the beginning but I am having another issue, when I export in Premiere (I haven’t tried in media encoder), I try to change the output format (pixels) and it display some error in frame rate and progression, so I changed directly in the Aspect Ratio but always I get the video with the black stripes (sometimes very thiny but still there)
Any workaround? Or should I use media enconder so I can crop it as I want.
Regards
Miguel
Pål
Hi Miguel!
Personally, I always use media encoder to get total control over my exported videos. So I would recommend that you use the encoder, and save a preset so you have easy access to your settings the next time you want to export videos with custom crops and aspect ratios.
Miguel Torres
Hello, I tried to do so, i mad a PNG image on Photoshop, edited my video, but my issue is when I have to export the video, I put the Crop tool but when it export still puts the black frames.
Somebody can help me how to make the crop tool work
Regards,
Miguel
Pål
Hi Miguel!
Which version of Premiere and Media Encoder are you working on?
It’s important to remember several things in the export settings. First, crop the correct amount of pixels from Top and Bottom (e.g. 132 pix). This is done on the source monitor in the export settings dialogue (see screenshot in the original post). Second, go to the Video tab and input the correct width ang height in the basic settings (e.g. 1920×816 px). Double check the export summary, to see that you keep the crop factor.
What container and codec do you export to?
leon
thanks a lot i used it on this not quite finished piece of work http://youtu.be/265mckmUV_U